
02 Mar DML Commands
DML Commands In SQL
AUTHOR:
Dr. Geeta Mandar Mete (Ph.D., M.C.S, MBA(HR and IT). This Article Published in Developer IQ Asia’s #1 Technology Magazine.
Whats Is DML?
A data manipulation language (DML) is a computer programming language used for adding (inserting), deleting, and modifying (updating) data in a database. A DML is often a sublanguage of a broader database language such as SQL, with the DML comprising some of the operators in the language. Read-only selecting of data is sometimes distinguished as being part of a separate Data Query Language (DQL), but it is closely related and sometimes also considered a component of a DML; some operators may perform both selecting (reading) and writing.
Types Of DML Commands In SQL
- The Insert Command
- The Update Command
- The Delete Command
- Merge Statement
Data Manipulation Language Commands (DML Commands) statements are used for managing data in the database. DML commands are not auto-committed. It means changes made by DML command are not permanent to the database, it can be rolled back.
1.The Insert Command
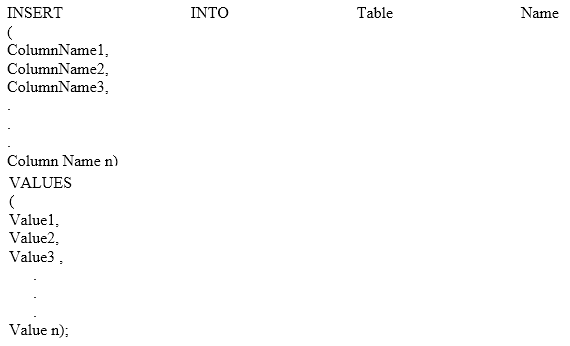
This type of DML Command is used to insert the data in the table.
Syntax 1
Syntax2

Syntax3
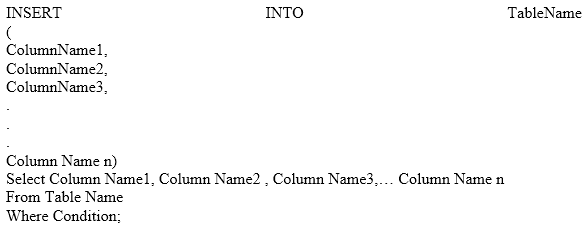
We can use the following Insert commands to insert the data in the table

We can use the following Insert Command to insert the data for some columns from the Employees table. The command will be as follows

The above command will fetch the employees id, his first name, last name, hire date and salary from the employees table and insert the values into the GM_ENGINEER2011 table. The select statement specified above will retrieve the data for the columns mentioned in the command.
We can also insert NULL values by firing an INSERT command as shown below. We can do this by omitting the column from the list or by specifying the value NULL for that column as shown in the example below.

A value of NULL will be inserted for that column only after checking the constraints that are enforced on that column. If the constraint does not allow the NULL values for the columns then the INSERT command will fail.
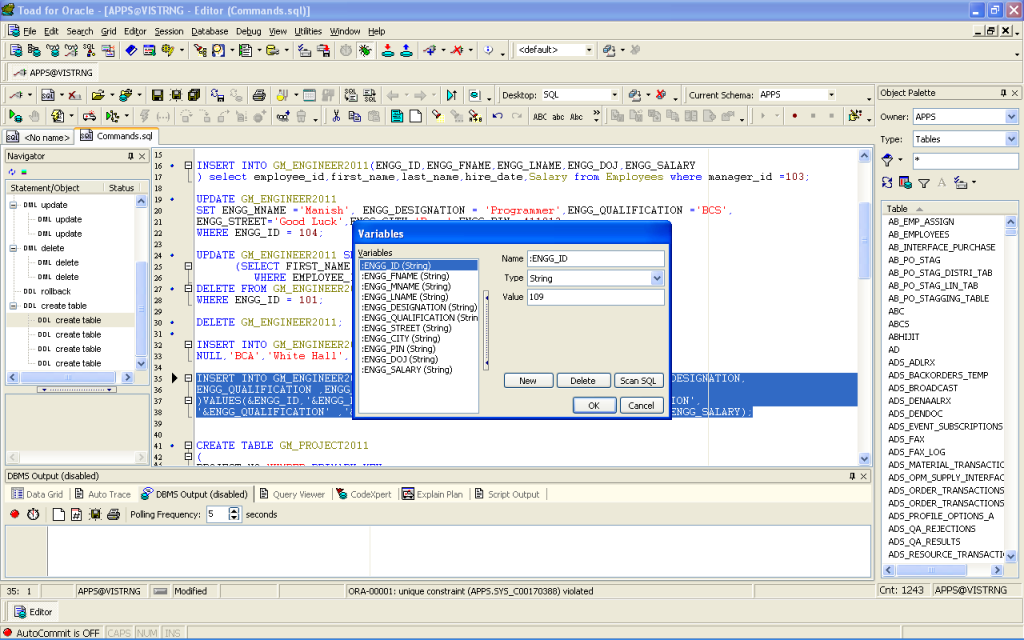
We can use the substitution variables in the INSERT command to ask the user to enter the values when the command is fired. The substitution variable is a variable with an ampersand. The command for such an insert statement will be

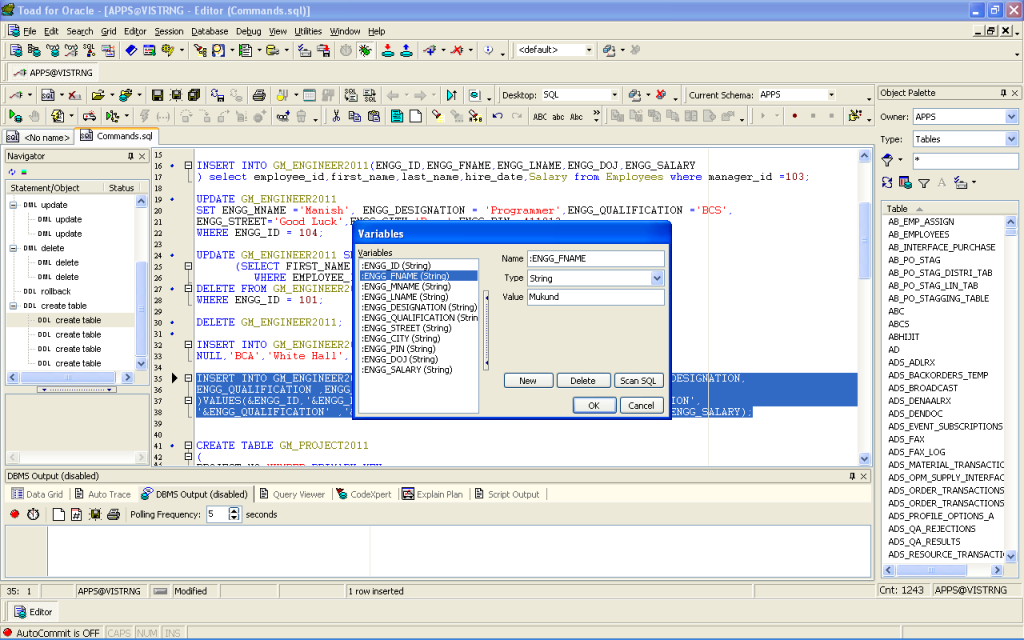
We observe that the columns whose datatype is varchar2 have to be enclosed in single quotes. After firing the above command, the user will be prompted for the values as shown in the below screenshot.
An INSERT command can also make use of the DEFAULT values that are assigned when the table is created.
For e.g. we can use the following insert command to insert a default value for the Engg_Designation column in the GMEngineer2011 table.

2.The Update Command
The update DML command is used to update the data in the tables.
Syntax1:

Look at the insert command given below

We observe that we haven’t inserted values for the columns ENGG_MNAME,ENGG_DESIGNATION,ENGG_QUALIFICATION,
ENGG_STREET,ENGG_CITY and ENGG_PIN.
We can use the Update command to put the values for these columns. The command will be

We can also use the update command in the following way

In the above DML command, we are updating the Engineers First Name and Last Name by selecting the first name and the last name from the Employees table.
3.The Delete Command
The delete command is used to delete records from the table. These records can be deleted based on some conditions.
Syntax:
Delete From TableName
Where Condition;

If we execute the above command without specifying the where condition then all the records in the table will be deleted. The structure of the table is preserved.
We can use the operators like IN, NOT IN, BETWEEN AND, relational operators like <,>,<=,>=,<> etc to write conditions.
It is worth noting that we cannot delete a row that is a primary key in one table and is used as a foreign key in another table. Such a delete command will fail.
4.MERGE Statement
The MERGE statement is a DML command. This command allows us to insert or update the data conditionally in the table. An UPDATE is performed if the row exists and an INSERT is performed if the row is a new row. The INSERT or UPDATE is performed depending on whether matching records exist in the table or not. If the matching records exist in the table then an UPDATE is executed else an INSERT is executed. This command helps us avoid multiple updates.
Syntax:

Let us assume that we have created a table for storing the information about the bonus that the Engineer gets.
The create command for that table would look like

We execute the following commands to insert the data into the Bonus table
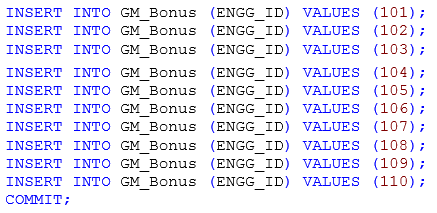
We use the following MERGE statement which is also called an UPSERT statement. The below-given MERGE statement is updating the salary of the engineers based on whether the Engineer Id exists in the GM_ENGINEER2011 table or not. If a match exists then the Engineers bonus is updated in the GM_Bonus table else a new row is inserted with the values for Engineer Id and bonus.

The screenshot below shows the execution result of the MERGE statement.

It is very important to note that we should commit the changes that have been made to the data in the tables. Therefore if the AUTOCOMMIT feature is not set to ON, we need to write COMMIT; to make the changes permanently. Let us now move ahead with Data Retrieval Language.
DATA RETRIEVAL LANGUAGE
We use the SELECT statement to retrieve the data from the database. The general syntax of the select statement is

The first line of the SELECT statement specifies the list of columns that need to be displayed. The keyword DISTINCT is used to eliminate the duplicate data while projecting. The “*” is used when we want to display all the contents of the table. The second line tells the source for these columns. These are nothing but the table names. The third line tells the condition on which the data in the columns should be filtered. The next three lines are the advanced features of the SELECT statement. We will look at them in the subsequent section. Let us look at the SELECT statement by writing some queries
1.Displaying the entire contents of a table

2. Displaying specific columns from the table.

The above command displays the engineer’s id, engineer’s first name, engineer’s last name, and his salary.
3. Displaying the data based on a condition
We can make use of the WHERE clause to specify the condition. The condition can make use of comparison operators like <, >, <=,>=,= and <>, != or ^= (Not equal to operator). It can also make use of other operators like BETWEEN … AND, LIKE, IS NULL and set operators like IN. We can also make use of the logical operators like AND, OR and NOT.
Example 1: Query to fetch the data of those engineers who earn a salary of more than Rs. 20000.

Example 2: Query to fetch the data of those engineers who earn a salary in the range of Rs. 20000 and Rs. 70000.

Example 3: Query to fetch the data of those engineers who are programmers and earn a salary in the range of Rs. 15000 and Rs. 35000.

Observe that we have made use of the logical operator AND. The above query will display results only if both the conditions are satisfied. We can use the OR operator if we want either condition to be true as shown below. The below-given query will display all those engineers who are either programmers or who earn a salary in between Rs.15000 and Rs. 35000 or are both programmers as well as earn the salary in the range.

We can use the NOT operator to negate the condition. The below-given query will display all those engineers who are not programmers.

4. Using expressions in the SELECT clause
We can make use of Arithmetic operators like +,-,/,* and % to construct expressions.
Example: Query to display the salary of the engineer and bonus which is calculated as 10% of the salary.

In the above query Engineer Bonus is the column name for the evaluated expression.
5. Using DISTINCT
We make use of the word DISTINCT to eliminate the duplicate data in the column.
Example: Query to display distinct designations of the Engineer.

The ORDER BY clause
The Order BY clause is used to sort the data. The data can be sorted in the ascending order or in the descending order by using the keyword ASC or DESC. By default, the data is sorted in the ascending order. The use of ASC is optional. If we wish to sort the data in the descending order then we need to use the work DESC.
Example 1: Display the list of all the projects in ascending order of their budget.

Example 2: Display the details of engineers in descending order of their Salary

We can also use the relative position to sort the data. Consider the following query

The above query will sort the result in ascending order of the Project Name. Here the relative position of the first field i.e PROJECT_NO is 1, PROJECT_NAME is 2, LOCATION is 3 and so on.
Look at the following query now.

The above query will first sort the data in the ascending order of LOCATION and then a secondary sort in the descending order of the BUDGET.
You can try out the above query in the following fashion as well. The output will be the same.

The GROUP BY clause
The group by clause is used to create groups of data. The general syntax while using the GROUP BY clause is
SELECT Column1, Column 2, …, Group Function(Column n)
FROM Source Tables
WHERE Condition(s)
GROUP BY (List of columns without group functions)
In the above syntax, the WHERE clause is used to consider those rows (satisfying the conditions) while making groups. We can make use of the following group functions.
- Sum() : Calculates the total
- Min() : Selects the minimum value
- Max() : Selects the maximum value
- Count() : Calculates the count excluding the Null value
- Count(*) : Calculates the count including the Null value
- Avg() : Calculate the average
Example1: Displaying city-wise sum of the salary.

The above query will first calculate the sum of the salary city wise. Here the data is thus grouped based on the city and then the corresponding salary of the engineer is taken to evaluate the sum.
If we use the above query by specifying the WHERE clause then the output of the query will differ as shown in the screenshot.

The HAVING Clause
The HAVING clause is used to apply the filter on the groups that are to be displayed. When the HAVING clause is applied, Oracle server first groups the rows, then it applies the group by function on those rows and lastly, it displays only those rows that match with the condition specified in the HAVING clause.
Example 1: Displaying city-wise sum of the salary of where the sum of salary exceeds 70000

Lastly, we can write a SELECT statement that includes all the clauses that we studied above. Look at the example below

The query will first select those rows with a salary greater than 10000. These rows will be further grouped city wise with their respective counts. Filtering criteria will be further applied on the count to display only those cities with a count greater than 2.
ORACLE APPS R12 TECHNICAL ONLINE/CLASSROOM TRAINING COURSE WITH 100% WRITTEN JOB GUARANTEE
Related Topics
SQL INTERVIEW QUESTIONS AND ANSWERS 2020

Basics Of SQL


No Comments